
Next to the Overview Tab, you’ll see another tab called Automations.
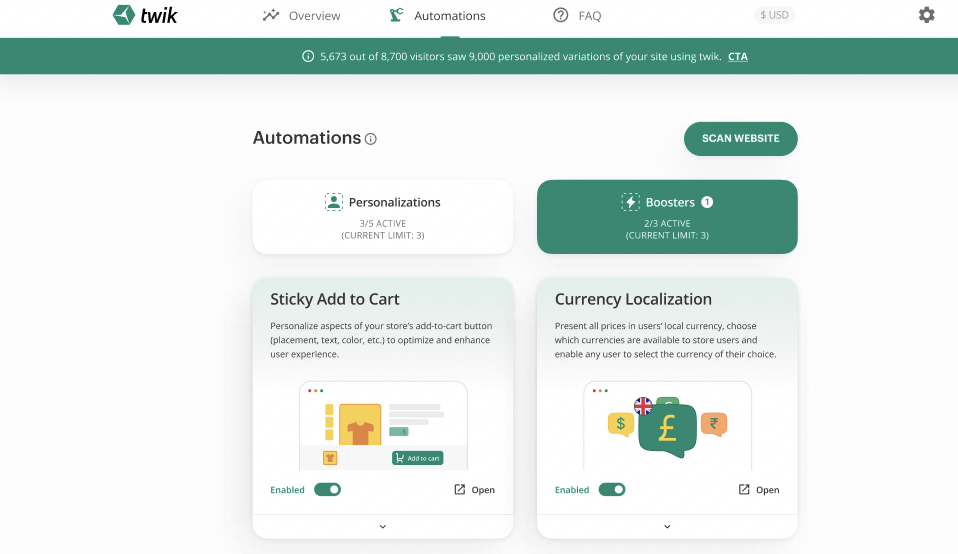
The Automations tab consists of two separate sections, Personalizations and Boosters. Not every store has all automations available to them, as it depends on the design of your store, along with additional deciding factors. Clicking Scan Website at the top right corner of the Automations tab scans your website and evaluates if there are any new automations available to your store. For example, making design changes on your store could potentially reveal more automations that weren’t previously offered to you, so it’s important to scan your website every now and then to evaluate if there are new automation options for your store.
Personalizations
![]()
The personalization options include:
Product Catalogues – Here you can personalize your product grids, and show each of your users the products they’re most likely to be interested in first, based on their browsing history.
Navigational Menus – Automatically sort shop navigation menus according to each user’s behavior and browsed content.
Homepage Categories – Here you’re able to automatically organize homepage categories based on each user’s behavior and previously browsed products.
Product Recommendations – Personalize product recommendations presented to each user according to their browsing behavior and previously viewed items.
Personalized Search – Automatically personalize your search results by sorting suggestions based on each user’s preferences.
You can enable or disable any personalization by using the toggle on the bottom left corner of any given personalization box. You can also view how any of the personalizations actually work in your store, by clicking Live Demo at the bottom right corner of any personalization. This will redirect you to your store with twik’s personalization enabled, show you how it works, and what it does.
Boosters
The booster options include Sticky Add to Cart and Currency Localization.
Unlike personalizations that are just enabled or disabled, and of course differ from user to user in terms of what it physically presents to your store’s visitors, boosters are not only enabled or disabled, but also have settings of their own where you can alter different components. It’s also important to note that when a booster is enabled, all of your users will experience this addition in the same exact way.
In the Automations tab under boosters, there is a booster called Sticky Add to Cart. Click the bottom right hand corner of that booster where it says ‘Open’ to open this booster’s settings.
![]()
The entire booster can be enabled by clicking the ‘enabled’ toggle on the top right hand corner of the Sticky Add to Cart settings. Below that you’ll see two options for the Display Mode, where you can choose where the add-to-cart button appears. Next to where it says Call to Action, you can alter the text within the button itself. For example, if you want your add-to-cart button to say “Add to Basket” instead, you can alter the text there. Below that, you have the option to change the text color and background color of the bar and the button, and alter views between desktop and mobile. In the Visible Elements section, you can choose which elements you would like to be included in the add to cart bar, and in the Position on Page section, you can choose if you’d like the bar to display on the top or bottom of the page.
At the bottom of this settings page, you’ll see a section called Preview, where you can see what all of these alterations and elements look like in your store before you make changes. Make sure to click Save Changes at the top of the page to save your changes.
Next we have the Currency Localization, and you can enter its setting the same way as we did with Sticky Add to Cart, just click Open at the bottom right corner of the Currency Localization box in boosters under the Automations tab.
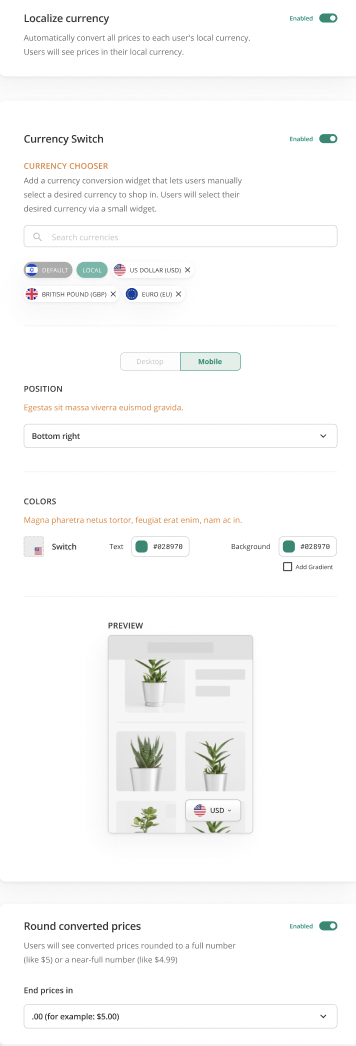
The settings of this booster are a bit different than the former. To simply localize currency on your site, which presents your products’ prices to each of your store visitors in their local currency, use the toggle to the right of where it says Localize currency.
Below that, you can enable a currency switch, which allows you to add a dropdown menu of currencies for your users. The only currencies they will see in the dropdown menu are those that you have entered in the Currency Chooser. You’re also able to customize the placement, text color, and background color of the switch itself.
The last optional element of this booster is found at the bottom of this settings page, where you can enable your prices to be rounded to a full number. You can choose from the dropdown menu which prices you’d like to be rounded. Note that if you enable this element, your prices will go back to the original price when checking out.